# SSH Jump Host - Getting Started
Note:
This Getting Started guide is designed for the free software version and self-hosted version of BastionXP. For the cloud-hosted SaaS version of BastionXP, follow the cloud-hosted version's Getting Started guide.
Follow the steps below to install and run BastionXP as SSH Certificate Manager with built-in SSH Bastion Host(Jump Host) support.
# Prerequisites
You need to have the following to install and run BastionXP server
- Two Linux VMs: one for the BastionXP bastion host PKI/CA and one for the SSH host that needs an SSH host certificate.
- A registered domain name like
bastionxp.example.com - SSL certificate for the registered domain name
- GitHub OAuth Credentials for SSO + 2FA Login
- Open up TCP ports 443, 4020 and 4021 in the bastion host VM and port 4022 in the host VM.
| TCP Port | Description |
|---|---|
| 443 | Web Portal |
| 4020 | SSH Proxy/Jump Host |
| 4021 | Reverse Proxy Server |
| 4022 | SSHd server |
Tip:
For testing purposes, you can even use localhost for your registered domain name and create a self-signed SSL certificate for the localhost domain. In this case, the BastionXP PKI/CA Bastion Host, SSH server, and SSH client instances all run in the same node or VM.
Note:
This document explains how to configure BastionXP as a PKI/CA bastion host (jump host), to securely access host machines running OpenSSH SSHd server.
If you want SSH session recording/replay feature and host certificate auto renewal/rotation feature to work, you need to install and configure BastionXP to run as SSHd in host machines as well. Please refer to the documentation on: BastionXP as SSHd Server
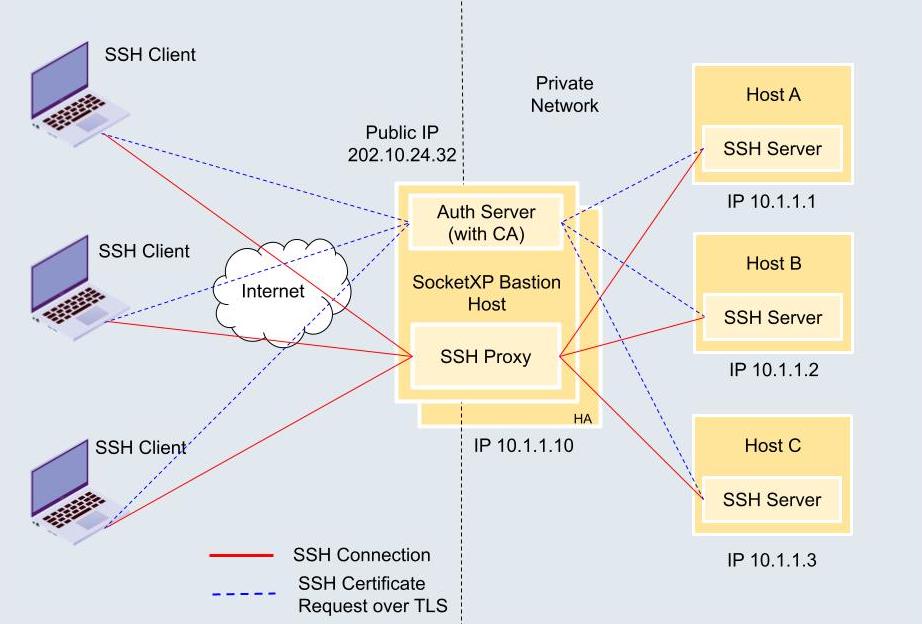
# Overview
We'll use the following bastion host setup for our reference. We'll be configuring only one SSH host and one SSH client in this Getting Started guide.
# Goal
The goal of this documentation guide is to show you:
- How to setup BastionXP server(VM) as a PKI/CA that issues SSH certificates to hosts(VM) in your private cloud and to end users who wants access to these hosts. The BastionXP instance would also act like an SSH bastion host or jump host to access the hosts in your private cloud that are not exposed to the internet directly.
- How to setup the BastionXP client utility named
bshon the host machines and how to usebshto login and download SSH host certificates from the BastionXP PKI/CA instance. - How to setup the BastionXP client
bshon the end user laptops running Windows/MacOS/Linux and how to usebshto login and download SSH user certificates from the BastionXP PKI/CA instance. - How to login from the SSH client machine (Laptop/PC) into the SSH host machines (VMs) via the BastionXP SSH proxy (VM) using SSH Certificates.
# BastionXP VM Setup
# Step 1.1 - Download and Install
On the BastionXP VM, follow the instructions here to download and install (opens new window) the appropriate BastionXP binary package for your Linux distro as RPM or Debian package.
BastionXP CA will be installed and running as a Linux Systemd Daemon in the background.
# Step 1.2 - Configuration
You need to setup the following configurations.
# Setup 1.2.1 - Configuration File
Create a config.json file in the /etc/bastionxp directory with the following contents. Create the directory /etc/bastionxp before you begin.
{
    "mode": "proxy",
    "gateway_domain": "bastionxp.example.com",
    "email": "[email protected]",
    "ssh_ca_enable": true,
    "provisioners": [{
            "type": "OIDC",
            "name":"github",
            "client_id": "38asdf232erwefasdf",
            "secret": "abcdefghicjadfasdfasdf2342334234dsadf234"
    }]
}
Note:
Please don't forget to update the gateway_domain to your own domain name.
Also update the email field with your GitHub email address which is the primary verified email address associated with your GitHub account. This is required to allow the BastionXP admin to login via GitHub OAuth SSO into the BastionXP web portal.
If you want to run Bastionxp in "auth" mode (that is, you want the PKI/CA functionality only) without the SSH proxy functionality, change the mode to "auth" instead of "proxy" in the config.json file. Use the "auth" only mode, when you prefer to use the OpenSSH server to act like an SSH jump host or bastion host.
The SSH Certificate Authority function is not enabled by default. You need to turn it ON by setting the ssh_ca_enable flag to true in the config file.
# Step 1.2.2 - SSL Certificate
By default, BastionXP will automatically generate a self-signed SSL certificate for the BastionXP's domain name.
You can override this default behaviour, and request BastionXP to automatically fetch a free SSL certificate from Let's Encrypt (opens new window) using ACME, by setting the following flag in the configuration file and restarting the service.
{
  ...
  "lets_encrypt_acme": true,
  ...
  ...
}
# Step 1.2.3 - GitHub OAuth Credentials
Follow the detailed instructions in the GitHub OAuth documentation page to: Create a free GitHub OAuth creditials for use with the BastionXP app (opens new window)
Use https://your-domain-name/api/logincallback as the OIDC client app's login callback API. For this example, we'll register https://bastionxp.example.com/api/logincallback as the login callback API with the OIDC provider.
To configure the BastionXP server to use your GitHub credentials such as the client_id and secret, add the following configuration to the config.json file:
{
    ...
    ...
    "provisioners": [{
            "type": "OIDC",
            "name":"github",
            "client_id": "38asdf232erwefasdf",
            "secret": "abcdefghicjadfasdfasdf2342334234dsadf234"
    }]
    ...
    ...
}
Note:
Enterprise version of the software has support for G-Suite, Microsoft Office 365, Keycloak, Okta and more. The free version has the support for GitHub SSO login only.
To quickly try the BastionXP SSH CA and Jump Host functionality, you can use the BastionXP's built-in login/password based authentication to provision SSH certificates. Use the below configuration to do enable BastionXP login/password based authentication:
{
    ...
    ...
    "provisioners": [{
            "type": "OIDC",
            "name":"bastionxp",
            "client_id": "",
            "secret": ""
    }]
    ...
    ...
}
Note:
The default password for the admin user is admin. You need to change this password after the first login.
# Step 1.3 - Restart
Now restart the BastionXP service already running in the background, to pickup the above configuration changes.
sudo systemctl restart bastionxp
You can check the bastionxp logs as shown below:
tail -f /var/lib/bastionxp/bastionxp-proxy.log
# Step 1.4 - Login to the web portal
Now point your web browser to https://bastionxp.example.com (replace your domain name for example.com). Login using your GitHub credentials as an admin user [Use the primary_user_email specified in the configuration file ].
After you login, go to the "Teams" section, edit your email account listed there. Add the login names you would use to login to your host machines, eg: root, ec2-user, dev-team, alice, dave etc. Perform this action before you login and download SSH user certificates from your client machines. The SSH user certificates issued will have these login names in the principals directive. The host machine will not allow SSH login by an end user, if the SSH user certificate doesn't contain a valid login name in the principals.
Add the email IDs of your team members and update the roles and logins manually for each user.
Note:
Make sure that TCP ports 443 and 4020 are opened up in BastionXP VM under the firewall settings. BastionXP web portal and auth server are reachable via the port 443. TCP port 4020 is the BastionXP proxy port.
# Host VM Setup
# Step 2.1 - Download BastionXP Client
Follow the instructions here to download and install (opens new window) BastionXP Client bsh in the host VM.
Next we need to download the SSH Host Certificate for the host VM. For this we need to get an authtoken from the web portal as an admin user.
# Step 2.2 - Authtoken
Login to the BastionXP web portal using GitHub SSO as a primary user. Go to the Authtoken page and create a new token with the purpose selected as HOST_CERTIFICATE. Once a new HOST_CERTIFICATE token is created, expand the row and copy the authtoken.
Use the authtoken in the below command to download a host certificate for the host VM.
Note:
Note that this is a short-lived authtoken and it will expire in 10 minutes. If it expires, you need to recreate a new token for the same purpose.
# Step 2.3 - Login and Download SSH Host Certificate
bsh login --proxy bastionxp.example.com --host host1.example.com --token <authtoken>
View the SSH host certificates downloaded from the BastionXP server VM as part of the login process.
$ ls ~/.bsh
ssh_host-cert.pub   ssh_host   ssh_user_ca.pub
tls_ca-cert.pem tls_server-cert.pem
Move these files to the /etc/ssh folder.
sudo mv ~/.bsh/* /etc/ssh
# Step 2.4 - Update SSHd configuration
Now we need to make the SSHd server to start using the SSH host certificate. Edit the /etc/ssh/sshd_config file as a sudo user and update the following configuration settings.
$ nano /etc/ssh/sshd_config

...

Host /etc/ssh/ssh_host
HostCertificate /etc/ssh/ssh_host-cert.pub
TrustedUserCAKeys /etc/ssh/ssh_user_ca.pub

...
# Step 2.5 - Restart SSHd Service
Finally, restart the SSHd service to make the configuration changes take effect. Verify if the SSHd is online, after the restart.
sudo systemctl restart sshd
sudo systemctl status sshd
# SSH Client Setup
# Step 3.1 - Download BastionXP Client
Follow the instructions here to download and install (opens new window) BastionXP Client bsh in your machine.
# Step 3.2 - Login and Download SSH User Certificate
bsh login --proxy bastionxp.example.com
You'll be redirected to a web browser where you'll be asked to login into your GitHub account using your username, password and the two-Factor Authentication(2FA).
You could optionally use a --no-redirect flag to prevent redirecting to your default browser.
Check if the user certificate has been downloaded to the .bsh folder in the user's HOME directory, at the end of the login process.
$ ls -l ~/.bsh
ssh_user-cert.pub   ssh_user   ssh_host_ca-cert.pub
tls_ca-cert.pem  tls_client-cert.pem
# Step 3.3 - Update the SSH Client Configuration
Update the OpenSSH client config file ssh_config to use the BastionXP as the bastion host or jump host. Also, make the SSH client to use the SSH user certificate as an identity, as shown below for an example user alice:
$ nano ~/.ssh/ssh_config
...

Host host1
Hostname host1.example.com
ProxyJump jumphost
User alice
IdentityFile  /home/alice/.bsh/ssh_user

Host jumphost
Hostname bastionxp.example.com
Port 4020
User alice
IdentityFile /home/alice/.bsh/ssh_user

...
You could use the host VM's internal IP, in the place of its domain name.
Next, edit the SSH client's known_hosts file and add the Host CA's SSH certificate as the certificate authority for the host, using the @cert-authority directive. This config will ensure that the SSH client will accept any SSH host certificate signed by the SSH host CA. It will not display any Trust On First Use (TOFU) message when the SSH client connects to the host. Please note that you need to copy paste the contents of the ssh_host_ca-cert.pub file into the known_hosts file as shown below.
$ nano ~/.ssh/known_hosts

# Accept any host in *.example.com, whose certificate is signed by the following CA
@cert-authority *.example.com ssh-rsa AAXasdyeBN....
Note:
Delete all stale known names for the host from the known_hosts file.
# Step 3.4 - SSH Login
Now SSH login to the host VM using the SSH client as shown below
ssh host1
Alternatively, you could use the .bsh client to ssh into the host VM as shown below:
bsh ssh --proxy bastionxp.example.com [email protected] -p 22
Questions:
If you have any questions or suggestions, please email us at: [email protected]