Table of Content
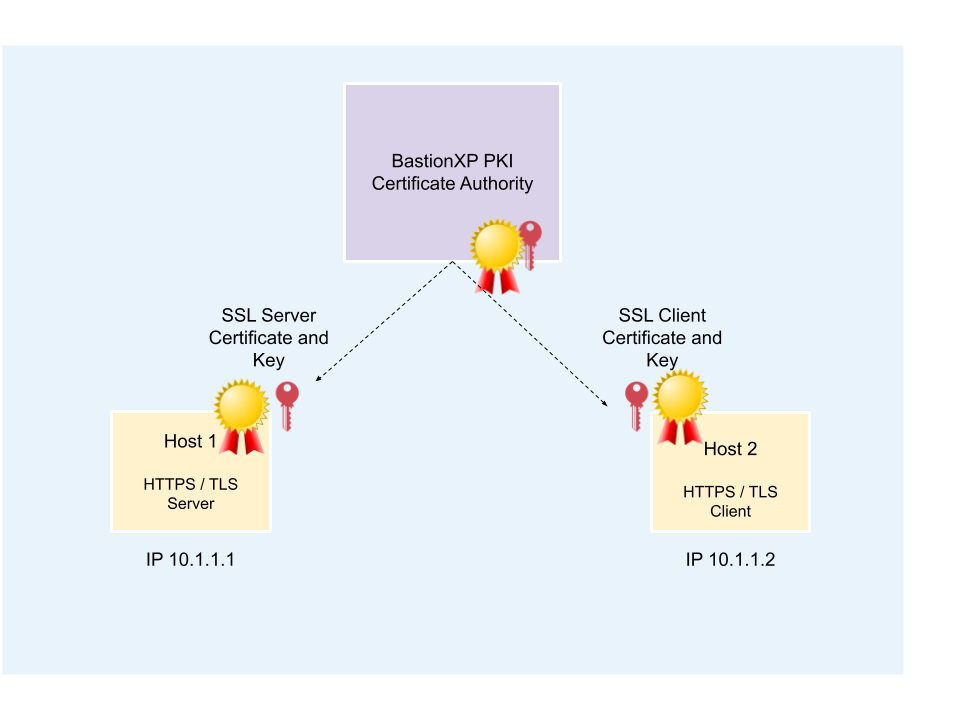
Table of Content
In this article, we’ll discuss how to use OpenSSL tool to create self-signed SSL X.509 certificates. These self-signed SSL X.509 certificates can be used by any HTTPS or TLS server and client application for secure SSL/TLS connection over the internet.
For example, the generated X.509 certificates can be used to configure any webserver (Apache, NGNIX, Wordpress), Database (MySQL, Postgresql DB), IoT gateway/devices or even your own web app server(HTTPS) and web app client.
The client SSL/TLS X.509 certificate can be used for any application that requires mutual TLS authentication for Zero Trust Security.
Learn how to use BastionXP SSL Certificate Manager to centrally manage SSL/TLS X.509 certificates. Automate creation, signing, distribution and renewal of certificates to servers, clients, workloads, databases and humans based on their identity.
Overview:
Following are the steps to generate SSL X.509 self-signed certificates:
- We will use the OpenSSL tool to create a Root CA certificate and private key.
- We will also create X.509 server private key, server certificate signing request(CSR), client private key and client certificate signing request(CSR).
- We will then use the CA key to sign the X.509 server certificate signing request and the X.509 client certificate signing request.
- Once the certificates are signed successfully, the OpenSSL tool will generate the self-signed X.509 server and client certificates.
Pre-requisites:
You should have the OpenSSL tool downloaded and installed on your machine.
For example, on Debian Linux (Ubuntu) you could use the following command:
sudo apt-get install libssl-dev
On RPM Linux (CentOS, RedHat)
yum install -y openssl-devel
Step #1 - Create Root CA Certificate and Key
Step 1.1 - Generate Root CA Private Key:
We’ll generate a RSA type private key that is 2048 bits in length. Longer the key, harder it becomes to crack the key, and therefore more secure.
openssl genrsa -out ca-key.pem 2048
Step 1.2 - Generate Root CA Certificate
Now, let’s generate the CA certificate using the CA private key generated in the previous step. The certificate will be valid for next 365 days.
openssl req -new -x509 -nodes -days 365 \
   -key ca-key.pem \
   -out ca-cert.pem
The above command will prompt you for additional details about your company, org, internal domain name of the CA for which the certificate is being requested.
Sample Input Values for the CA Certificate
You are about to be asked to enter information that will be incorporated
into your certificate request.
What you are about to enter is what is called a Distinguished Name or a DN.
There are quite a few fields but you can leave some blank
For some fields there will be a default value,
If you enter '.', the field will be left blank.
-----
Country Name (2 letter code) []:US
State or Province Name (full name) []:DE
Locality Name (eg, city) []:Lewes
Organization Name (eg, company) []:BastionXP
Organizational Unit Name (eg, section) []:Engineering
Common Name (eg, fully qualified host name) []:ca.bastionxp.com
Email Address []:[email protected]

Please enter the following 'extra' attributes
to be sent with your certificate request
A challenge password []:
Step #2 - Create Server Certificate and Key
Step 2.1 - Generate Server Private Key and Server CSR
The following command will create a new server private key and a server certificate signing request(CSR).
openssl req -newkey rsa:2048 -nodes -days 365 \
   -keyout server-key.pem \
   -out server-req.pem
The above command will prompt you for additional details about your company, org, internal domain name of the server for which the certificate is being requested.
Sample Input Values for the Server Certificate:
Generating a 2048 bit RSA private key
................+++++
.....................................................+++++
writing new private key to 'server-key.pem'
-----
You are about to be asked to enter information that will be incorporated
into your certificate request.
What you are about to enter is what is called a Distinguished Name or a DN.
There are quite a few fields but you can leave some blank
For some fields there will be a default value,
If you enter '.', the field will be left blank.
-----
Country Name (2 letter code) []:US
State or Province Name (full name) []:DE
Locality Name (eg, city) []:Lewes
Organization Name (eg, company) []:BastionXP
Organizational Unit Name (eg, section) []:Engineering
Common Name (eg, fully qualified host name) []:host1.bastionxp.com
Email Address []:[email protected]

Please enter the following 'extra' attributes
to be sent with your certificate request
A challenge password []:
Step 2.2 - Server Certificate Creation and Signing using CA Key.
We’ll use the CAKey and CA cert file to sign the server CSR.
openssl x509 -req -days 365 -set_serial 01 \
   -in server-req.pem \
   -out server-cert.pem \
   -CA ca-cert.pem \
   -CAkey ca-key.pem \
   -extensions SAN   \
   -extfile <(printf "\n[SAN]\nsubjectAltName=DNS:host1.bastionxp.com\nextendedKeyUsage=serverAuth")
Just providing CommonName or CN in the CSR is not enough. Using CN is obsolete. You should add the SubjectAlternateName or SAN extension to the certificate. Otherwise, you may get an error shown below when using the certificate without the SAN extension.
x509: certificate relies on legacy Common Name field, use SANs instead
For added security, we should restrict the certificate to be used by a SSL/TLS/HTTPS server application only and not by any SSL/TLS/HTTPS client application. For this purpose, we’ll use the ExtendedKeyUsage key with a value of serverAuth
Step #3 - Create Client Certificate and Key
Step 3.1 - Generate Client Private Key and Client CSR
openssl req -newkey rsa:2048 -nodes -days 365 \
   -keyout client-key.pem \
   -out client-req.pem
Sample Input Values for the Client Certificate:
Generating a 2048 bit RSA private key
................+++++
.....................................................+++++
writing new private key to 'client-key.pem'
-----
You are about to be asked to enter information that will be incorporated
into your certificate request.
What you are about to enter is what is called a Distinguished Name or a DN.
There are quite a few fields but you can leave some blank
For some fields there will be a default value,
If you enter '.', the field will be left blank.
-----
Country Name (2 letter code) []:US
State or Province Name (full name) []:DE
Locality Name (eg, city) []:Lewes
Organization Name (eg, company) []:BastionXP
Organizational Unit Name (eg, section) []:Engineering
Common Name (eg, fully qualified host name) []:host2.bastionxp.com
Email Address []:[email protected]

Please enter the following 'extra' attributes
to be sent with your certificate request
A challenge password []:
Step 3.2 - Client Certificate Creation and Signing using CA Key
We’ll use the CAKey and CA cert file to sign the client CSR.
openssl x509 -req -days 365 -set_serial 01  \
   -in client-req.pem    -out client-cert.pem  \
   -CA ca-cert.pem   \
   -CAkey ca-key.pem   \
   -extensions SAN  \
   -extfile <(printf "\n[SAN]\nsubjectAltName=DNS:host2.bastionxp.com\nextendedKeyUsage=clientAuth")
For added security, we should restrict the certificate to be used by a SSL/TLS/HTTPS client application only and not by any SSL/TLS/HTTPS server application. For this purpose, we’ll use the ExtendedKeyUsage key with a value of clientAuth
Step #4 - Inspect the Certificates
Use the following command to dump the certificates and visually inspect various fields in the certificate.
$ openssl x509 -in client-cert.pem -noout -text
Certificate:
    Data:
        Version: 3 (0x2)
        Serial Number: 1 (0x1)
    Signature Algorithm: sha256WithRSAEncryption
        Issuer: C=US, ST=DE, L=Lewes, O=BastionXP, CN=ca.bastionxp.com/[email protected]
        Validity
            Not Before: Mar  6 08:52:32 2023 GMT
            Not After : Mar  5 08:52:32 2024 GMT
        Subject: C=US, ST=DE, L=Lewes, O=BastionXP, CN=host2.bastionxp.com/[email protected]
        Subject Public Key Info:
            Public Key Algorithm: rsaEncryption
                RSA Public-Key: (2048 bit)
                Modulus:
                    00:cf:21:b6:b8:44:89:ee:63:34:96:cb:10:aa:9c:
                    44:0a:41:1a:8c:01:9d  ...
                Exponent: 65537 (0x10001)
        X509v3 extensions:
            X509v3 Subject Alternative Name:
                DNS:host2.bastionxp.com
            X509v3 Extended Key Usage:
                TLS Web Client Authentication
    Signature Algorithm: sha256WithRSAEncryption
         a5:98:5a:c8:bf:17:3f:fc:af:ea:06:cf:ca:82:04:70:b6:87:
         1f:16:8f:16:8f:3a:27  ...
Conclusion:
OpenSSL tool generates SSL/TLS X.509 certificates that are great for one-off usecases.
However, using OpenSSL tool to manually generate private keys and certificates at scale is a cumbersome manual process that is prone for human errors. Moreover, it becomes hard to track and secure manually generated SSL private keys (at scale) when copying and pasting it to a different server or client machine manually (causing Key Sprawl).
Also, rotating certificates and keys periodically is a good security practise. Many organizations postpone the rotation process because significant time and resources are required to manually perform the certificate rotation. Delaying certificate rotation is a huge security risk for an organization.
BastionXP SSL/TLS Certificate Manager
BastionXP PKI/CA automates, simplifies and secures creation, signing, distribution and rotation of SSL/TLS and SSH certificates. Enforce mutual TLS authentication within your organization for Zero Trust Security.
Moreover, BastionXP PKI/CA generates short-lived SSL/TLS client certificates that are valid just for few hours. This way admins can restrict end user access to previleged resources for a limited period of time. BastionXP generates certificates to end users after a successful login using 2FA SSO providers such as Microsoft Azure 365 AD, Google G-Suite, Okta, Keycloak, GitHub and more.
To know more about BastionXP PKI/CA solution or if you have any questions, please write to us at: [email protected]
About BastionXP
BastionXP is a cloud-native private CA and device identity management platform that eliminates passwords and shared secrets by issuing hardware-attested certificates to mobile devices and laptops. Secure access to your Wi-Fi, VPN, and SaaS applications in your enterprise network. Replace legacy SCEP with automated ACME Device Attestation. No shared secrets. Zero credential theft. Learn more about BastionXP →